Serendipity

So, last summer I decided that my daughter needed twirly skirts. I’m not sure why I felt this way, as I am sooo NOT a twirly skirt person! However, as those of you who have a daughter, granddaughter, or niece (or have ever ventured near a shopping mall, the girls’ clothing section in the department store, or the PINK toy aisle, for that matter) are probably aware (or, maybe not – you do you!), leggings and twirly skirts are all the rage (or at least were in the later summer and early fall). But, I had been shopping for legging patterns with the intent of whipping up a few pairs, and ran across Simplicity 1785. Seeing that it had a one-piece legging pattern (sooo much easier than two!), I snatched it up at a $1.99 sale at JoAnn. In addition to the leggings (I made three pairs, they are so fun and easy!), the cute skirts caught my eye, with their clever pleats and tutu-style poufiness.

During this episode, I was also emailing back and forth with my sister about skirt designs for a skirt for her daughter, and I was also in the process of gathering together inexpensive mix-and-match pieces for my daughter’s fall wardrobe, gathering cute sale leggings and onesies for basics, with the intention of adding cute flairs of style here and there through T-shirts, dresses, and blouses that could be layered together for lots of great looks. (Me, obsessing about baby fashion… well, in my defense, I had a lot of free time, okay?)

The two main items I had fallen in love with were a pretty floral sheer tulle skirt and a pair of cable-knit leggings, and the skirt was SOOO expensive for a baby skirt!! So, I took another look at the skirt included in Simplicity 1785, read through the instructions, and decided to give it a shot. I dug through my stash and got to work, quickly finishing one as a trial in a cute graphic floral. The tulle underskirt failed miserably, which is fine, I’m not a tutu fan, but the skirt turned out super cute without it! After I finished it, I started the second one, a heavier-weight brushed cotton flannel (Plaiditudes from JoAnn, for curious readers) in an awesome purple herringbone pattern.

Well, I screwed up cutting the purple fabric, and had to improvise. The instructions call for cutting two skirt pieces and two yokes – the tricky part is that the skirt pieces BOTH get cut out of the fold, but I for some reason decided to NOT cut my second piece on the fold, and had to fudge because my cutting didn’t add in seam allowances (oops). I managed to figure it out, but ended up with less fabric to work with. So, I had to make the yoke narrower and leave the waistband off. But, I managed to get the thing assembled to the point where it just needed hemming and waistband, and then set it aside to work on something else, and haven’t touched it since.

Until today. For some reason, I got itchy fingers and pulled out the skirt again since it was such a quick finish. Hey, all my Christmas gift projects are done (…right? ::mentally tallies:: OK, yeah), so I had a little wiggle room. Finished up the hem, got the waistband finished, and now it’s ready to go.

Where the serendipity comes in is that I had bought a cute T-shirt for my daughter a month or so ago depicting an ice skater on a river through a forest, in gray and purple shades, but didn’t really have anything my daughter could wear it with… until today!!

I ran across the T-shirt in a pile of clean laundry shortly after finishing the skirt, and on impulse, put it together with the skirt. And Voila! My daughter has an ADORABLE holiday outfit to wear to a party tonight:

FullSizeRender

This outfit is SO cute, and she even has a cute pair of Fair Isle pattern knit leggings to go with! I do need to find a shirt or onesie she can wear under it, but. I always LOVE it when things come together in unexpected and unplanned for ways!

What projects have you worked on and set aside that you were able to come back to later and finish lickety-split with awesome results? Share in the comments!!

Have a happy holiday, dear readers!

Project Completed

A project that took two years to complete…! But finally, done! =)

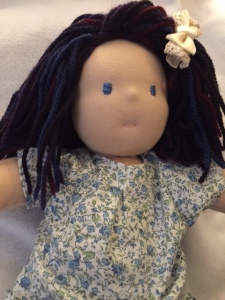
It is a Waldorf-style soft doll, with a cotton knit body and 100% natural wool stuffing. Hand-embroidered face, multi-colored wool yarn hair, and hand-felted & sculpted head.

The principle behind Waldorf dolls and education is simple, all-natural materials and organic (naturally-flowing – not the organic you think of regarding food), imaginative play. The simplicity of the face is so the child who adopts the doll can imagine it as expressing any emotion and being a true companion who mirrors their experiences. I just think the simple faces look so sweet! And the reason for the 100% wool stuffing is because it retains warmth, so Waldorf dolls really are excellent cuddle buddies!

Next time, I plan to use a heavier knit and pre-sew the leg- and arm-joints so they are easier to stuff; the knit fabric got holes in it rather quickly, even though I used ball point needles. I’m going to whip up a couple simple outfits for the doll next, and secure its hair more tightly to the head… Anyways. Fun project! Quite a challenge though…!

I’d like to credit Bungalow Bear’s Etsy shop, my sister Anne, & Weir Crafts for supplies. Also, Weir Crafts, Echoes of a Dream, and Meg McElwee’s awesome book, Growing Up Sew Liberated, for tutorials, patterns, and instructions. I am not sponsored by any of these companies, nor do I work for them, but they all provided excellent instruction and quality fabrics and materials. My sister Anne is the one who got me started thinking about this style of doll in the first place, so here she is!

IMG_3123.JPG


I just think she turned out so sweet. I love the funky, multi-colored hair too. I didn’t style it as I was making the wig, I just crocheted a wig cap from worsted-weight wool yarn, and cut lots of strands the same length, hooking them into the cap. Having the strands all the same length is what created the shaggy sort of layered look it has. It reminds me a rock star! I think it’s awesome. Next time I might try a little harder to get them all the same length, but for my first time I really just wanted to learn the technique and not worry about things like making sure all the hair strands were the same length.

Well, so she’s done! And I’m so happy. I can’t wait until the kids see her on Christmas morning! I hope they love her. 🙂

Update!

I made the overalls and shirt for this doll out of Meg McElwee’s book as well and have plans to use a lengthened version of the blouse pattern for a flannel nightgown:


image2 IMG_3237

I used some denim I already had on hand for the overalls, which I really did not cut wrong, intending to have them be two-tone when I cut the fabric. ::shiftyeyes:: (mental note: always make sure you’re cutting on the correct side of the fabric…). These were a bit of a pain, as this wasn’t thin denim, this was standard, heavy bottom weight denim I had bought as a remnant, and it is just unwieldy in this scale.

Denim is great, don’t get me wrong. I have never been fond of it for sewing, or for anything besides jeans (and I really don’t like stiff jeans at all), however, and this just confirmed it for me. This particular denim was very thick and stiff, not really conducive to maneuvering into tiny turned straps, as once i had more than two layers to sew through, my machine fought me every step of the way (even on the heavyweight woven setting!). As a result, I did not enjoy working with it for this, and kind of wish I’d gone less “authentic” and used a lightweight chambray – so keep that in mind if you decide to make your own dolly overalls – get a thinner denim, and make sure you can manipulate the fabric easily when you’re looking at it in the store.

IMG_3239 IMG_3238

As you may be able to see from these photos, the blouse has a sweet little pleat detail in the front that really adds a nice touch to the simplicity of the pattern. I really didn’t think the blouse would turn out as lovely as it did in this blue floral, which I have literally had stashed in my fat quarter bin since I first started quilting. So, yes, this fabric is vintage early-2000s, and I give myself a HUGE pat on the back for finally using it with such great results. Go me!

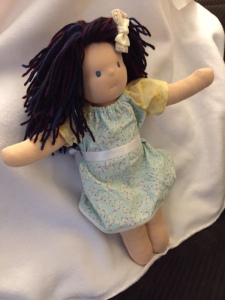
I also used this tutorial and pattern from ruthplustwo to make a simple peasant dress:

IMG_3240 IMG_3241

The dress’s raglan-style neckline was a little big as designed, but I shortened the elastic. It was a little too big around also, so I tied a simple satin ribbon around the waist to hold it on the doll. As a 1-year-old will be playing with her as well as a 5-year-old, I need to figure out how to keep the ribbon on, but I’ll get there at some point.

I also didn’t have the correct width of bias tape handy, so I just sewed it onto the back side of the neckline to create the elastic casing, instead of following the bound look the original tutorial uses. It turned out sooo darling, so thanks much to RuthPlusTwo (and Pinterest, which is where I ran across the pattern!)!

Have you finished any old projects recently? Share in the comments!! I love to hear project stories!